Thursday, November 5, 2015
DIY Long Neck Dino


Remember a few weeks ago when I told you all about how I had been published in Mollie Makes Magazine? Well, today I am going to show you how to make the cute and cuddly dinosaur from that issue!

I love to create "one of a kind" toys & decor for my children. To me, it's much more meaningful than buying them pre-made things. For this particular project, I wanted to make something large enough for a toddler to ride, in addition to something that would also act as a colorful accent piece in my Baby Boy's nursery. What better animal to choose than a longneck dinosaur? Now I just have to hide this dinosaur from my three year old daughter until Baby Boy gets old enough to appreciate him, haha!


My terms of use are included in the download folder, but please do not redistribute or sell this pattern and/or items made from this pattern & tutorial.

I used a high quality upholstery fabric. I LOVE it, and it is so durable, that this guy will (hopefully) last a long time through vigorous play.
The materials you will need to sew your own Dino are as follows:
-1 1/8 Yards of Fabric (I used upholstery fabric from Hobby Lobby)
-A Needle and Matching Thread
-A Extra Large Bag of Poly Fill
-Coordinating Fabric for the spots
-Fabric Glue
-Small Sheet of Black Felt for the Eyes
-The Printable PDF Pattern (link above)

1. Place the two pieces together and sew from the chest up to the tail tip.

2. Lift the legs up.

3. Place the belly piece on top of the body pieces; aligning the legs perfectly.
.png)
4. Leaving the bottoms of the feet, and one side of the tail open, sew up the rest of the sections where the belly and body pieces meet.

5. Above you can see where I left the tail and feet unsewn.

6. Sew the feet piece onto the sections left open in the previous step.

7. Now your dino is ready to turn inside out by pulling it though the hole we left unsewn on the tail.

8. Sometimes it helps to shake it. You may need to gently push out the small parts, like the tail, using something pointy like a pencil.

9. Now he is ready to stuff!

10. Fill with poly fill and stuff until it is very firm. Make sure to pack it in very tightly, especially in areas like the neck and feet. My daughter loves sitting on her large stuffed animal toys, so I made sure it was extra sturdy. I also stuck a large, thick dowel up the neck to help support it. That way it will stay upright. Once you literally can't stuff him anymore, sew up the opening on the tail.

11. Cut out eyes using felt. I used two fabrics for extra interest.

12. Cut out Spots.

13. Glue on spots and eyes using fabric glue. I was too lazy to sew them all on. ;)

And your dinosaur is done and ready to play!

This little guy measures 20 inches tall, and is 28 inches long (from nose to tail)
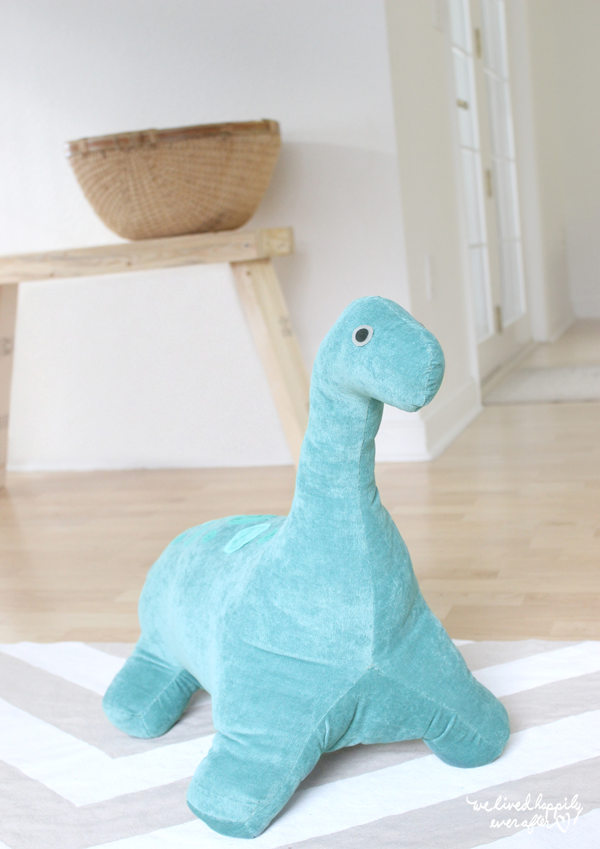
He would be the perfect addition to a nursery, and make a wonderful gift to a child- or the dinosaur loving adult in your life!

And the best part is that YOU made him yourself.

The End. ;)
Subscribe to:
Post Comments (Atom)
No comments:
Post a Comment