Thursday, November 5, 2015
How To Disassemble a Pallet, The Easy Way! (And Other Tips & Tricks)


The pallet craze is pretty awesome in my opinion... I mean it's free & pre-aged wood! My husband and I probably had about 20 of them in our garage over the past few months. I kid not.

I'm not an expert on all things building, but I wanted to share a few tips and pointers that we've learned from our many pallet projects.
1. Where to Find Free Pallets.
Almost every store uses them, so drive around & snoop out dumpster areas especially. We got most of ours from a pool supply company. You can find them on the sides of the road too. Sometimes people even put listings up on Craigslist because they have a bunch they need to get rid of.
BUT always ask before taking. Business, after all, use them for work; so don't just assume they are free for the taking. Most the time they will say yes if you ask nicely. :)

2. How to tell if you are using SAFE Pallets.
Most pallets are stamped to show if they have been Heat Treated (HT), or Treated Chemically with Methyl Bromide (MB)
The board pictured above was treated with heat, which makes it safe to use. Avoid pallets treated with MB.
When in Doubt: if a pallet is unmarked, looks really old, grimy, dark, or oily, then I would suggest staying away from it. Even if it was treated safely, you don't know what may have spilled on it, or if it was used for something chemical.
I was so desperate for pallets at first, that we took home a super grimy one from a mechanic's shop. And then we found some beautiful, clean ones. Needless to say, we got rid of the "questionably black-ish" pallet from the mechanics soon after. Not worth it.
Also, consider WHAT you are using the pallets for. I would suggest staying away from using them for food surfaces. :)
Lastly, some pallets are really roughly milled. And to me, that's what gives them their rustic beauty. But if you are using them for something that will have cloth or skin contact, like a table or dresser, it's a really good idea to sand them down to avoid splinters.

3. How we "quickly" disassemble our pallets.
While there is no "right" way to disassemble a pallet, we've taken apart several for our DIY projects, and have thus come up with a fairly quick method for turning our pallets into boards.
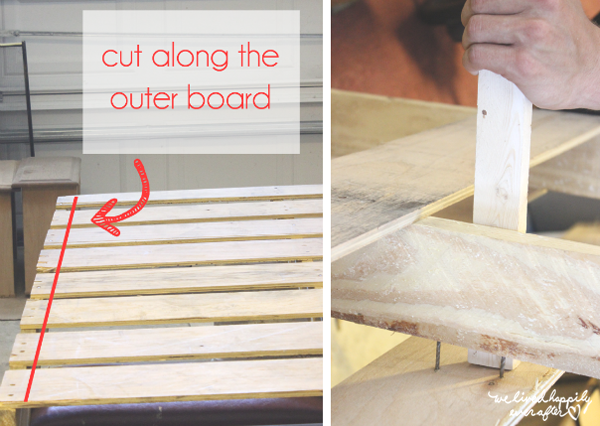
First, using our skil saw, we (or should I say Silas) cut the outer boards off of the baseboard. This makes your boards a few inches shorter, but in the long run, when you do this on both outer edges of the pallet, you are saving yourself 50 extra nails to yank out with your hammer. It's worth the lost inches folks! :P
Next, to get the nails out of the middles of the pallet boards, we reverse hammer the boards, making the nails and top board pop off the base. You can use a piece of wood in-between the board and hammer to avoid extra dents in the wood.

Once the board is off the pallet base, hammer the back of the nails out. If they don't pop out automatically, use the back of the hammer to yank out the nail.
It's quite a workout, and I'm not as good at this as Silas, so doing two pallets is enough to make me really tired and super sweaty. But it is so worth it in the end!
I think pallet companies should start using screws to make my life easier!!! Haha!
4. How to Use:
Right now I am in the middle of 3-4 pallet projects, because I love them that much!
The possibilities are pretty much endless! We've used them to re-surface several dressers in our home, frame artwork, build crates, build nightstands, and make pallet artwork.

Here's a full link list of my personal pallet projects, as shown in the collage above:
DIY Deer Head with Pallet Plaque | DIY Fox Head with Pallet Plaque | DIY Dresser Update using Pallets | How to Age New Wood to Look Like Pallets | Prairie Tree Artwork Frame & Free Print | DIY Pallet Crate | Pallet Joy Sign

Coming Soon: I can't wait to show you my latest Pallet Project, this adorable Letter J Marquee Light!
To stay updated on both my pallet projects, and all the pallet tutorials I think are really awesome, follow my Pinterest board EVERYTHING PALLETS.
Feel free to leave any questions you have in the comments & I will do my best to answer them!
What are you waiting for? Get building! :)
Subscribe to:
Post Comments (Atom)
No comments:
Post a Comment