Thursday, November 5, 2015
How to make your own Clickable Social Media Icons (Using Image Maps and Photoshop)

This tutorial requires minimal geeky knowledge...
Basically you need to be familiar with knowing how to paste HTML in your website (if you know how to add a HTML widget on your side bar, you're all set. If not, then it's really easy to learn!)
It also requires knowledge of the really basic basics of working with Photoshop..... and it might help if you know how to read. So yeah, it's pretty easy! :)
The following process uses some images I provided (free to download here) in a previous post.
People ask me all the time how I put my sidebar for my blog together, so I wanted to share the (super easy) process. I use these same techniques for everything from my blog menu to my "Hi!" snippet on my sidebar. Go ahead, check them out! :)
First, I want to show how I put the actual image together (the "icon buttons" and text on top)
You don't have to have Photoshop to do this. You can use a similar process by using the free actions in PicMonkey. If building an image on Photoshop is a no brainier to you then just skip to part two.
I "shaded out" the "unnecessary" stuff so that every step would be straight forward. If any of these steps confuse you, don't hesitate to ask. Photoshop is really easy to use once you get the feel of it. :)
All of the "shapes" I use in this tutorial are available for free download here.

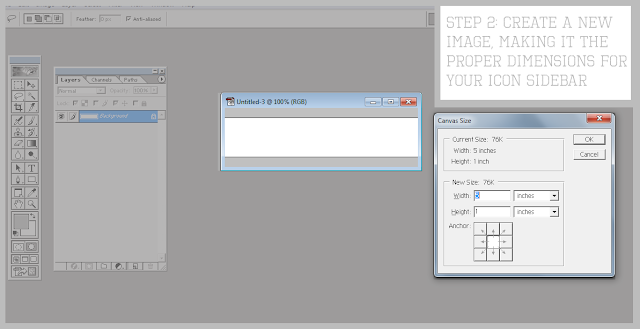
It's really important that you have the proper dimensions for your image. You don't want it overlapping anything on your blog. If you're using Blogger, here's how you see the exact width of your sidebar: Go to Design->Template->Customize->Adjust Widths. It should give you the size of your sidebar down to the pixels.
Since the social media bar is more vertical than horizontal, I adjusted the height of my icon to make sure it would fit.

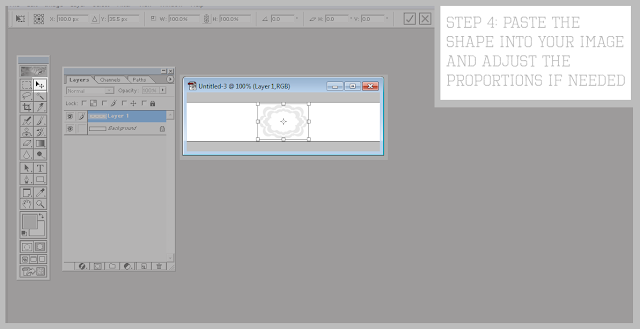
Now I can just click on the icon shape and adjust the width (I decided to make it less wide)
Since I wanted 4 or 5 social media options, I copied the icon I had just edited and pasted as needed.
Next, I used my text tool to write what each button was.
I advise saving as a png image as that is generally what is best for web use.
The rest of the steps for this process are done in my favorite free graphics tool: Image Maps.
See where it says, "paste your link here"??? Well, that;s where you're supposed to paste your link. :)
And now you have an amazing, interactive, CLICKABLE(!!!) Social Media Bar!!!

Now go out and impress everyone with your new digital graphics skills!
ps) ever so often the images may crash (I've had it happen to me once or twice) so make sure to save the original, non-image mapped image in case you need to re-map it.
Subscribe to:
Post Comments (Atom)
+banner+copy.png)


No comments:
Post a Comment