Thursday, November 5, 2015
Seahorse Pattern and Tutorial

I have taken a long break from blogging due to my move to be with my husband. It's been crazy busy and I haven't had internet for several weeks. But I'm finally online now(!!!) and am so excited to finally be able to share my latest sewing tutorial & pattern with you all!
This stuffed animal is a sweetie. I think that seahorses are just so adorable! I want to have one as a pet! But since that's kinda not going to happen right now, I had to settle for second best.... ;) My little girl loves her! So now I'm going to share the how to on making one for your "little mermaids" at home! :)
You will need about 2/3's of a yard of fabric for the seahorse body, and a 1/2 yard by 3.5" long strip of fabric for the spikes (more on that below)
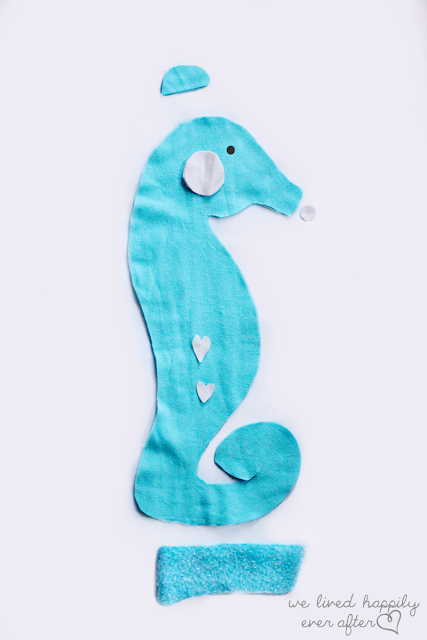
Tape the A, B, and C pattern pieces together. Cut two of the Body pieces, one mouth piece (the medium circle), two of the cheek pieces (the larger circle), and two of the eyes (the smaller circle), four ears (the rainbow half circle), and one of each of the hearts.
Cut out your pattern pieces. The folded up strip under all the pattern pieces in the photo above, is for the "spikes" on the back. I cut out a 1/2 yard long strip that was about 3.5" wide.
The first step for making your seahorse is marking where you are going to make the folds for the texture on your seahorse. This is a completely optional step, but I think it brings the seahorse to a whole different dimension. So if you want to have these "stripes" down the middle of your seahorse, make identical folds on both of your body pieces.
To make sure your folds are identical, fold them away from each other, almost like you were opening the pages of a book. That way you can pin in place and once sewn, the lines will match up identically. Mark where each fold will be.
Do the following step to each individual place where you want a body fold:
Take the body piece and pinch up about 1/2 and inch and sew a straight stitch through it. Repeat with both body pieces so that you have identical body folds.
Take your strip of fabric (the one that's about a 1/2 a yard long and 3.5 inches long) and sew both sides together then cut it into squares.
Cut it width-wise and then sew one of the open sides closed, so you only have one open side out of the four. Turn it inside out.
Lay your body piece out with the front of the fabric (the side that will be showing) face up. I personally used the pinched up fabric side as my front. Pin the "spikes" in place with the one open side facing away from the body. We will be pinning the other body piece with the front facing towards the other front body piece and then turning it inside out, so you want to make sure that you position your "spikes" so that they will poke out enough once turned inside out. Also, make sure they all flow evenly so that they don't show up jagged and uneven once turned inside out.
Place the other body piece with the front facing down (the two fronts should be facing each other) Pin the spikes and the body pieces in place.
Sew the body pieces together, leaving several inches in the middle tummy section unsewn.
Turn inside out.
Stuff the seahorse with poly fill.
Sew the opening closed.
Now sew the ears by placing the two ear pieces with the fronts facing each other. Sew the "rainbow" edges together, leaving the flat bottom unsewn. Turn inside out.
Pinch to give it form.
Sew onto the head.
For the mouth, push an indent into the face with your finger.
Place your circle for the mouth into your indent and sew it in place for the mouth.
Now sew the cheeks and eyes on patch style. For more details on how to sew child safe stuffed animal eyes, visit my post here.
Sew on your heart patches.
Now your pretty little seahorse is finished, from head...
... to tail!
I think this is my all time favorite stuffed animal that I've made.
The best part is that it's a really, really easy straight forward pattern to follow and sew.
Thanks for stopping by! Hope you enjoy your seahorse!
Subscribe to:
Post Comments (Atom)


No comments:
Post a Comment